Back to: Python Programming
The Radiobutton is a widget used to implement one-of-many selections. Radiobuttons can contain text or images, and you can associate a Python function or method with each button. When the button is pressed, Tkinter automatically calls that function or method.
Syntax:
button = Radiobutton(master, text=”Button Name”, variable = “shared variable”, value = “values of each button”, options = values, …)
shared variable = A Tkinter variable shared among all Radio buttons
value = each radiobutton should have different value otherwise more than 1 radiobutton will get selected.
Examples:
Let’s write some code to allow you to choose ONE(1) item from three (3) available options. You are heading to the cinema and need to choose either chips, icecream or popcorn. We’ll begin by creating a list called snack, then make some radio buttons by iterating through a for loop based on the number of snack items available.
#~~ Importing Tkinter module ~~
from tkinter import *

snack= ["chips","icecream","popcorn"]

#~~ Creating Tkinter window ~~
window = Tk()

choice = IntVar()

#~~ Creating the Radio Buttons ~~
for index in range(len(snack)):
    radiobutton = Radiobutton(window,
                              text=snack[index], # adds text to radio buttons
                              variable=choice,   # groups radio button items to variable "choice"
                              value=index)       # assigns each radio button the list value
    radiobutton.pack()

window.mainloop()
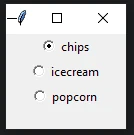
The window created is pretty basic and the Radiobuttons are centred (by default) and have the same as the names entered in the list. At this time, there is no output because we haven’t told the program what to do, but note also that we can select ONLY ONE snack at a time.
The Tkinter Radiobutton widget uses the generic pack() method for layout, which accepts several configuration options (properties or arguments) to control its placement and appearance. The pack() method places widgets relative to each other in a row or column.
Key pack() properties for Radiobutton widgets include:
| Property | Description |
|---|---|
anchor | Specifies where the radiobutton sits in a larger space. Common values are tk.N (north), tk.S (south), tk.E (east), tk.W (west), or tk.CENTER (default). This is especially useful for aligning a column of radio buttons with different text lengths. |
expand | If set to True, the widget expands to fill any extra space in the parent container. |
fill | Determines if the widget should fill the available space in the X, Y, or both directions (tk.X, tk.Y, or tk.BOTH). |
padx/pady | Adds external horizontal/vertical padding (space outside the widget’s border) in pixels. |
ipadx/ipady | Adds internal horizontal/vertical padding (space inside the widget’s border) in pixels. |
side | Specifies which side of the container the widget should be placed against. Options are tk.TOP (default), tk.BOTTOM, tk.LEFT, or tk.RIGHT. This is crucial for arranging radio buttons horizontally or vertically. |
Using the pack method we can tidy up the look of the buttons by aligning them to the left (West) and adding some padding, we can change the font.
#~~ Importing Tkinter module ~~
from tkinter import *

snack= ["chips","icecream","popcorn"]

#~~ Creating Tkinter window ~~
window = Tk()

choice = IntVar()

#~~ Creating the Radio Buttons ~~
for index in range(len(snack)):
    radiobutton = Radiobutton(window,
                              text=snack[index], # adds text to radio buttons
                              variable=choice,   # groups radio button items to variable "choice"
                              value=index,       # assigns each radio button the list value
                              padx = 25,         # adds padding on x-axis
                              font = ("Impact", 40)),  # change the label font
                              indicatoron = 1    # 0 - button tiles, 1 - default radio buttons
                              )
    radiobutton.pack(anchor=W)

window.mainloop()
The next step is to call a function when one of these buttons is pressed. We’ll call this function “order“.
#~~ Importing Tkinter module ~~
from tkinter import *

snack= ["chips","icecream","popcorn"]

#~~ Creating function to show selection ~~
def order():
    if(choice.get()==0):
        print("You ordered chips")
    elif(choice.get()==1):
        print("You ordered icecream")
    elif(choice.get()==2):
        print("You ordered popcorn")
    else:
        print("You have not ordered")

#~~ Creating Tkinter window ~~
window = Tk()

choice = IntVar()

#~~ Creating the Radio Buttons ~~
for index in range(len(snack)):
    radiobutton = Radiobutton(window,
                              text=snack[index], # adds text to radio buttons
                              variable=choice,   # groups radio button items to variable "choice"
                              value=index,       # assigns each radio button the list value
                              padx = 25,         # adds padding on x-axis
                              font = ("Impact", 40), # set the font of the radiobutton labels
                              indicatoron = 1,   # 0 - button tiles, 1 - default radio buttons
                              command=order     # calls on the function "order"
                              )
    radiobutton.pack(anchor=W)

window.mainloop()
Here’s another example:

The code:

#~~ Importing Tkinter module ~~
from tkinter import *

#~~ Creating Tkinter window ~~
window = Tk()
window.geometry("200x175")

#~~ Tkinter string variable able to store any string value ~~
selected_radio = StringVar(window, "1")

# Dictionary to create multiple buttons ~~
values = {"RadioButton 1" : "1",
          "RadioButton 2" : "2",
          "RadioButton 3" : "3",
          "RadioButton 4" : "4",
          "RadioButton 5" : "5"}

#~~ Loop is used to create multiple Radiobuttons rather than create each separately ~~
for (text, value) in values.items():
    Radiobutton(window, text = text,
                variable = selected_radio,
                value = value,
                indicator = 0,                  # indicator determines button 'look'
                background = "#caa7e6").pack(fill = X, ipady = 5)


# Infinite loop can be terminated by keyboard or mouse interrupt
# or by any predefined function (destroy())
mainloop()